
This mod is for those of you who want to keep the look of the stock exhaust, but just wish it was a bit louder than it comes stock. Should NOT require any additional tuning, but I will find out for sure later. Proceed at your own risk ")
I did this today using no tools other than a hacksaw and a vise (Okay, and a welder), just to show you that it can be done. Obviously, power tools make it go much faster, but it was nice to just have some time alone in the garage, so I decided to work harder not smarter
You will start out with a section of 2" OD stainless tubing, 6 inches is more than long enough. I used 16 gauge, if I did it again I would probably use 18 gauge just because it's that much easier to form and cut. The stock exhaust tip is 1.5" OD. This 2" tubing will fit, BUT you need to squish it in a vise and give it an oval shape. I squished it back about 2.5" from the end, just to make fitting easier.
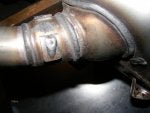
Once you have your new tip formed, you are going to remove the 3 bolts holding the stock cover on. Cut the nut and bracket off of the exhaust tip (You'll be re-using this later), and now cut the tip off. You're going to cut right behind the second weld. You've now essentially removed the stock DB killer.
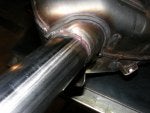
Now the fun part, you will reattach the exhaust cover with the two remaining bolts, and fit the new 2" tip. You'll need to cut the tubing at an angle in the back, or else it won't line up with the hole in the cover. I was lucky and got it on the first try, but 6" of tubing gives you plenty of room for trial and error. Once you think you have it, you'll tack weld the tip in place, and be sure to check the fit before you weld it! The fit is quite tight, so I advise to put plenty of tacks on, just to ensure it doesn't tweak on you. Once that's done, check fit one last time and have at it. I recommend using 309 filler, because your tip and the muffler are different alloys. 308 should be fine too though... But don't judge the crappy weld. Lol
Now that your new tip is welded on, simply use the cover as a guide and mark your final cut line with a sharpie (You'll have about an inch of extra material). I chose to have mine protrude slightly past the cover... It's your call. Last step, is trimming the bracket slightly and rewelding the nut onto your new tip, so that you can use all 3 mounting bolts again. I'm not sure if this is necessary, but I decided to do it anyway.
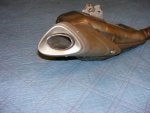
And now you're done. It looks so close to stock, most people won't even notice. I just need to spend a few minutes sanding it down smoother
I did this today using no tools other than a hacksaw and a vise (Okay, and a welder), just to show you that it can be done. Obviously, power tools make it go much faster, but it was nice to just have some time alone in the garage, so I decided to work harder not smarter
You will start out with a section of 2" OD stainless tubing, 6 inches is more than long enough. I used 16 gauge, if I did it again I would probably use 18 gauge just because it's that much easier to form and cut. The stock exhaust tip is 1.5" OD. This 2" tubing will fit, BUT you need to squish it in a vise and give it an oval shape. I squished it back about 2.5" from the end, just to make fitting easier.
Once you have your new tip formed, you are going to remove the 3 bolts holding the stock cover on. Cut the nut and bracket off of the exhaust tip (You'll be re-using this later), and now cut the tip off. You're going to cut right behind the second weld. You've now essentially removed the stock DB killer.
Now the fun part, you will reattach the exhaust cover with the two remaining bolts, and fit the new 2" tip. You'll need to cut the tubing at an angle in the back, or else it won't line up with the hole in the cover. I was lucky and got it on the first try, but 6" of tubing gives you plenty of room for trial and error. Once you think you have it, you'll tack weld the tip in place, and be sure to check the fit before you weld it! The fit is quite tight, so I advise to put plenty of tacks on, just to ensure it doesn't tweak on you. Once that's done, check fit one last time and have at it. I recommend using 309 filler, because your tip and the muffler are different alloys. 308 should be fine too though... But don't judge the crappy weld. Lol
Now that your new tip is welded on, simply use the cover as a guide and mark your final cut line with a sharpie (You'll have about an inch of extra material). I chose to have mine protrude slightly past the cover... It's your call. Last step, is trimming the bracket slightly and rewelding the nut onto your new tip, so that you can use all 3 mounting bolts again. I'm not sure if this is necessary, but I decided to do it anyway.
And now you're done. It looks so close to stock, most people won't even notice. I just need to spend a few minutes sanding it down smoother